Showing posts with label DIY. Show all posts

3.04.2013

Trends...

Metallic Cap Toes...


 Pointy toed shoes are back and in a BIG WAY!  So pull yours out of the back of your closet and dust them off!
The new way of sprucing up any shoe is the metallic cap!  Mostly done in the pointy toe version they are available in every price range, every colour and best yet, flats to sky high heights.

Pull out any old dress you have, re-wear it, but go and add this trendy new addition to it.  Will for sure breathe new life into an old outfit.  If you are strapped for cash, there are TONS of cap toe DIY videos and blogs out there; I am sure you can find zillions on Pinterest. 

Happy Cap-ing! 


1.31.2013

DIY...

Superbowl is this coming Sunday, and like most people I will be glued to my TV!  Not only for the actual game but for the Half Time show! *Beyonce clothing review Monday ;)

In the mean time over at {StyleMePretty} they had this 'Game Day' bingo!  So of course when I come across something AMAZING I have to share!!!  Even thought we don't get the American commercials this will not be hard to fill out at all!

How great would this to bring as a Hostess gift to a party you might be going to!
Don't forget to bring the prize too in that case..lol

GO TEAM! :)


supplies-art
White cardstock
Exacto knife or scissors
Printer
Bingo game cards (download them here!)
Red pens
A prize for the winner! (may we suggest a bottle of Tequila?)

Instructions-Art
Step 1: Download the bingo game cards.
Step 2: Print out the cards onto the cardstock.
Step 3: Cut out the cards along the gray lines.
Step 4: Give your guests the bingo cards along with some red pens, and watch those commercials like a hawk!
Step 5: Give the prize to whoever gets 5 in a row first (across, vertical or diagonal. Oh, and the football is a free square).

12.19.2012

DIY...

DIY nail art is all the rage lately, so why not spruce up your nails with some fun Holiday designs!
On Halloween I did {this} to my nails and got lots of ewwws and awwwss; its a fun way to add some punch to your outfit, or to your sweats if you have been eating lots and lots of turkey and sweets!

The reindeer's are my favourite!


All images via {Pinterest}

11.01.2012

DIY...

You can barely make it out on Monday's {post} but this is what my nails looked like!!  Awesome eh!  Now, one hand was much better done than the other but the affect remained the same!  I kept showing my nails off all night and stating how simple it was!

I got the idea from one of my favorite sites {HonestlyWTF} who did the tutorial for 'drippy nails' a week before Halloween.  Now, I did take lots of step by step pictures, but my cuticles are so bad the pictures I just cannot bring myself to post them! lol  Please head over to their site {here} and check out how simple it is!  I think I will do it again in purple or gold for New Years Eve, cause the effect is super wicked!


10.25.2012

DIY...

Today's DIY post is a great addition to any closet.  Either you have plastic hangers or wire ones (I shutter at the thought) or you are lucky enough to have poofy lace covered ones;  I am not that lucky.  And sometimes they don't have the little hooks for holding stuff up, why they all don't I will never know. 
A great tip is take some yarn and wrap it around, a touch of glue at start and finish will help keep the yarn in place.  This will help all those silky items, skinny straps stay in place and not fall of the hangers!

You can add bold colours like the picture below or do something sleek like black on white hangers or monochromatic, green hangers, green yarn.  So many choices!!  Plus look at the fun added to your closet with some colour!

DIY those hangers people!


7.05.2012

DIY...

Last week I told you all about my friend Laura's bachlorette, {here}.  You may have noticed in some of the pictures all of us ladies had flower wrist corsages, well I made them!  They were a way to all be a part of this day, and we totally stood out as LAURA'S GIRLS when we had them on that's for sure!  Inspired from Renee over at {Eat.Live.Shop} and a tweet she sent out that she herself was doing tool flowers for a bachlorette. 
So I took her idea and ran with it!

Below is my DIY for tool flowers!  These would be great attached to a barrett for a little girls hair, done in other colours for ANY other event where some people need to stand out! 
Think of the fun for shower events etc!

Get DIY'ing everyone!

These are the supplies you will need, tool, stretchy lace, paper fascinators 
and some beautiful beads (with flat backs.)

Measure the tool to be 4ft long and 6inches wide.

Roll the tool up until it is 1 inch wide and start to loop it around the fascinator.

Once all the tool is on, close the fascinator nice and tight.

Glue the lace together into a loop, then glue the lace to the fascinator to make the bracelet portion.

Now glue on a fancy bead of your choice to the top of the fascinator.

Now you fluff and seperate the 'pedals' to make it nice and big.
This is what it looks like all done!  A flower wrist corsage!

I happened to make a larger one for our bride.  
I did the pink flower first, then repeated the same steps 
with the white tool, and make it slightly larger.

6.26.2012

Summer Fun...

Wedding season is in full swing, and when one of your oldest friends gets married you throw her the best last fling that you can!  This weekend was exactly that, it was also the reason for no post yesterday I was exhausted from all the fun we had!

The weekend took place in Niagara Falls and here is the night in the all PG rated photos I could post!

I look forward to Laura marrying the love of her life in a few short weeks and watching them have a successful marriage in all the years to come!

 The view from our hotel suite at the Hilton Hotel.  We couldn't have asked for a better day!

Welcoming Laura to her party!

'Girls Night Out' Skor cupcakes made by my sister

What is a party without a fully stocked bar.

 Filled the party room with lots of DIY flag banners.

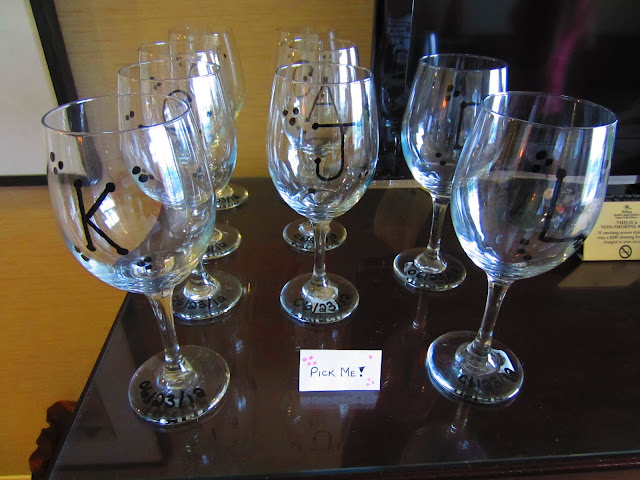
 I DIY'd all the girls a wine glass not only to use but to keep as a token of the fun night!
 
The ladies and I started up the day of fun with high tea at the {Queen Charlotte Tea Room}.  It was most definitly a high light of the day.  We had great conversation and all got to know each other better.

 Some of the ladies getting ready for the night out!


Laura in her shirt that got A LOT more signatures on it before the end of the night!

Congrats again Laura.  I do hope you had a great time and I cannot wait until your wedding!
And to all the ladies, thanks for making it all that more fun!

11.28.2011

DIY...

 Good Morning FimC peeps!

I had a great weekend taking full advantage of the North of the Border sales happening.  
Are you all shopped out as well?
I was also able to find time to put up my wee-Christmas tree and decorate the house too!  
And above all I went to the PRINCE concert on Friday night with my girlfriend Shannon... and lets just say UNREAL!  There is a reason the man is a legend.  Top 5 concert of all time for sure!
 
 Now onto today's post!  Enjoy your week everyone!
 
Trying to find high end items at low end price is something I pride myself on.  So when I came across {this} Charlotte Olympia beret from her ‘Charlotte’s Web’ collection at a price tag of approx $1100 Cdn I knew it was something I wouldn't have.  I searched the net and could not find anything close to it, so I decided to do something I am learning to get better at, DIY.  I got a great beret for $7 at {HM} and then chains from {Michaels} and voila I was set to re-create this hat.  Here is how I did the unthinkable in my world!
Here all the materials you need: beret, chains, pencil and some super glue


Use two different types of chain to add contrast to the web

I didn't have any chalk, so I used push pins to do a temporary layout of where I would glue the chains

Use the pencil or a toothpick to place the glue on the beret to help attach the chains.  Keeps the dollop of glue small.  Be very careful not to get the pencil super glued to your finger like this.  lol

Lay your beret over a bowl.  Since once the hat is on your head it bubbles, the bowl helps give the beret 'give' so the chains lay the proper way once finished.

Keep going!  Your almost done!

dum dum dum... the finished product!

A thousand dollar hat made for under $20, so sweet!!  
Can't wait to put this hat on this season with a great jacket and scarf!

10.13.2011

DIY...

I was seeing this DIY candle ALL OVER the internet, so to say exactly where I got the idea is very hard.  It is so simple to make I decided to make them for the ladies in my family as a small Thanksgiving Day treat.

So here is how I made it, so now you too can make them for your family and friends!

 Here are all the materials you need; cinnamon sticks, elastic bands, a candle and twine.  You will see ribbon/super glue in this picture and in the end I didn’t end up using them, just an FYI.


Wrap an elastic band around the candle you have chosen and then tuck in the cinnamon sticks.


Wrap twine, string, yarn or even the ribbon tightly around the candle, don’t take off the elastic band, it helps with the wrapping.  Tie in a bow!


Place in box for delivery!


See, super simple!  Now go enjoy the smell of cinnamon filling your house!